In the world of web development, having a local development environment is crucial. It allows you to test and build websites and web applications on your computer without affecting the live version. One of the most popular ways to achieve this is by using XAMPP.
XAMPP is a free and open-source software package that bundles Apache (a web server), MariaDB (a database), and php (a scripting language) together. It provides an easy-to-use solution for setting up a localhost environment, where you can experiment, learn, and develop websites without the need for an active internet connection or a remote web server.
In this guide, we'll walk you through the step-by-step process of installing XAMPP, configuring your localhost, and even setting up a wordpress site locally. By the end, you'll have a fully functional local development environment to fuel your web development journey.
XAMPP Localhost Setup: Your First Steps
Let's dive right in and get your localhost up and running:
- Download XAMPP: Head over to the official Apache Friends website (https://www.apachefriends.org/) and download the XAMPP installer for your operating system (Windows, macOS, or Linux).
- Install XAMPP: Run the installer and follow the on-screen prompts. You can choose the default installation location or specify a custom one.
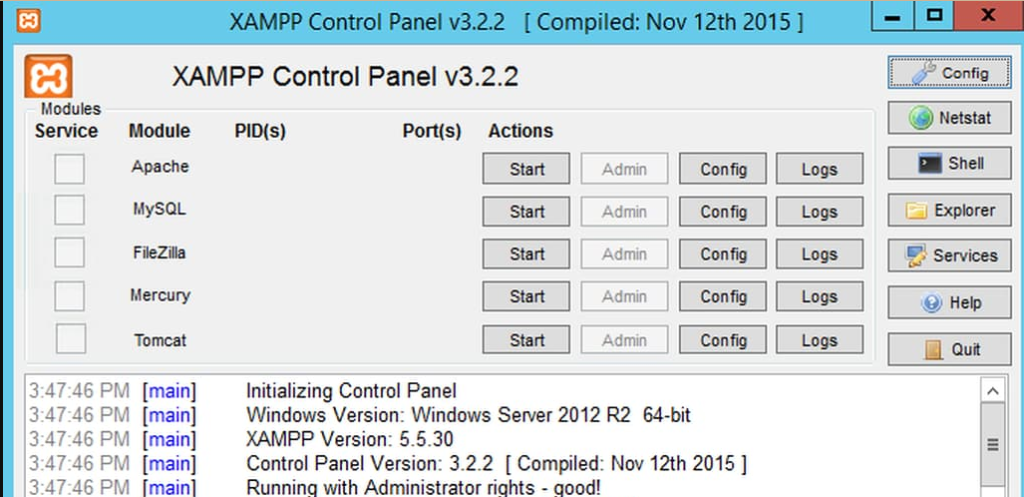
- Start XAMPP Control Panel: After installation, launch the XAMPP Control Panel. You'll see a list of components, including Apache and MySQL.
- Start Apache and MySQL: Click the "Start" buttons next to Apache and MySQL. This will start the web server and database services.
- Test Your Localhost: Open your web browser and type "localhost" in the address bar. You should see the XAMPP welcome page, indicating that your localhost is successfully set up.
Where to Put Your Website: The htdocs Folder
The htdocs folder within your XAMPP installation directory is where you'll store all your website files. Any files placed in this folder will be accessible through your localhost.
For example, if you create a file named index.html inside the htdocs folder, you can access it by typing http://localhost/index.html in your browser.
How to Install XAMPP on Localhost: Troubleshooting Tips
While the XAMPP installation process is usually straightforward, you might encounter some common issues:
- Port Conflicts: If you have other services running on ports 80 (Apache) or 3306 (MySQL), you might need to change the ports used by XAMPP.
- Antivirus or Firewall Interference: Your antivirus or firewall software might block XAMPP. You might need to temporarily disable them or add exceptions for XAMPP.
- Installation Errors: If you encounter errors during installation, check the XAMPP logs for more details and search online for solutions.
Localhost Configuration with XAMPP: Fine-Tuning Your Environment
Once your localhost is up and running, you might want to customize some settings to better suit your needs:
- Change the Default Port: If you need to change the Apache or MySQL ports, you can do so in the XAMPP Control Panel's "Config" section.
- Set Up Virtual Hosts: Virtual hosts allow you to host multiple websites on your localhost, each with its domain name.
- Configure Security: Consider setting up basic authentication or restricting access to your localhost for added security.
How to Set Up Localhost for wordpress: A Quick Guide
XAMPP is a great way to run wordpress locally for development or testing purposes. Here's a quick overview:
- Download wordpress: Download the latest WordPress package from the official website (https://wordpress.org/).
- Create a Database: Use phpMyAdmin (accessible through your localhost) to create a new database for your WordPress site.
- Extract WordPress: Extract the WordPress package into a new folder within your htdocs directory (e.g., htdocs/mywordpresssite).
- Configure WordPress: Rename the wp-config-sample.php file to wp-config.php and fill in your database details (database name, username, password).
- Run the Installation: Access your WordPress site through your localhost (e.g., http://localhost/mywordpresssite) and follow the on-screen installation instructions.
Embracing the Future of Technology: The Importance of Local Development Environments
In the fast-paced world of web development, where technologies and trends are constantly evolving, having a local development environment like XAMPP is invaluable. It allows you to experiment with new ideas, test code changes, and build websites and applications without the risk of affecting your live site.
As we move further into the future of technology, where web experiences are becoming increasingly complex and interactive, local development environments will play an even more crucial role in the development process. They empower developers to iterate quickly, collaborate effectively, and deliver high-quality web solutions that meet the demands of the modern digital landscape.
How to Check Your XAMPP php Version: A Step-by-Step Guide
Understanding PHP and XAMPP
Before we delve into the process of checking your XAMPP PHP version, let's briefly understand what PHP and XAMPP are.
- PHP: PHP is a popular general-purpose scripting language that is widely used for web development. It's known for its simplicity, flexibility, and efficiency.
- XAMPP: XAMPP is a free and open-source software package that bundles together Apache HTTP Server, MySQL, MariaDB, Perl, and PHP. It's a convenient way to set up a local development environment on your computer.
Methods to Check Your XAMPP PHP Version
There are several methods to determine the PHP version installed in your XAMPP environment. Let's explore the most common ones:
1. Using the XAMPP Control Panel:
- Open XAMPP Control Panel: Locate the XAMPP Control Panel on your computer and double-click to open it.
- Check PHP Version: Look for the "PHP" module. The version number will be displayed next to it.
2. Accessing the PHP Information Page:
- Start Apache: Ensure that the Apache web server is running in the XAMPP Control Panel.
- Open a Web Browser: Open your preferred web browser and enter the following URL: http://localhost/phpinfo.php
- View PHP Information: A page containing detailed information about your PHP installation will be displayed, including the version number.
3. Using the Command Line:
- Open Command Prompt (Windows) or Terminal (macOS/Linux): Navigate to the directory where XAMPP is installed.
- Execute the PHP Command: Type php -v and press Enter. The current PHP version will be printed in the console.
4. Checking the php.ini File:
- Locate the php.ini File: The php.ini file contains configuration settings for PHP. It's usually located in the xampp/php directory.
- Open the File: Use a text editor to open the php.ini file.
- Search for php.ini_version: Look for the line that says php.ini_version. The value following this line indicates the PHP version.
Troubleshooting Common Issues
If you're unable to find the PHP version using the methods described above, here are some potential troubleshooting steps:
- Verify XAMPP Installation: Ensure that XAMPP is installed correctly and that the Apache web server is running.
- Check File Paths: Make sure the paths to the php.ini file and the phpinfo.php file are correct.
- Restart XAMPP: Sometimes, restarting XAMPP can resolve issues related to PHP version detection.
By following these steps, you should be able to successfully determine the PHP version installed in your XAMPP environment. This information is crucial for ensuring compatibility with your web applications and libraries.
Conclusion
Setting up a localhost with XAMPP is a fundamental step for any aspiring web developer. It provides a safe and controlled environment to learn, experiment, and build websites and applications.
By following the steps outlined in this guide, you can easily install XAMPP, configure your localhost, and even set up a WordPress site locally. Embrace the power of local development, and you'll be well on your way to mastering the art of web development and contributing to the future of technology!
Call to Action
- Share this guide with your fellow developers and tech enthusiasts!
- Have any questions or need further assistance? Leave a comment below, and we'll be happy to help!
- Check out our website for more tutorials and resources on web development and technology!